Table of Contents
2 Case Administration
All configuration tasks for Case Management Module are performed in the Case Administration page, available from the Cases navigation menu folder.
This section provides information on the configurable features available.

2.1 Managing Solutions
Solutions are the highest level of categorization available in the Case Management Module. All processes and case types most live within one and only one solution.
Display Solutions
To display the list of existing solutions in the Case Management Module, select the Solutions Item from the Object Type Drop Down. The existing solutions, if any, will display underneath the Object Type Search Component.
To view the details of the solution, click the solution name.

Solutions have the following attributes:
- Name: a user friendly, readable name for the solution.
- ID: the universally unique identifier (UUID) for the solution.
- Code: An appropriate abbreviation to reference solution quickly, especially useful in API calls.
- Status: indicates whether or not the solution is active or not; active solutions will appear to end users, provided they have access to the solution.
- Processes: list of processes which belong to the solution; for a complete discussion, see the Managing Process section.
- Permissions: A list of permissions required in order to access the solution, its processes or cases types. Users must have at least one of the listed attributes in order to access the solution. If no permissions are listed, then by default the solution is available to any user.
Create/Modify Solution
To create a solution, click the Create Solution Button on the Case Administration Page. The Create Solution Dialog box will appear:

Provide values for the Name and Code fields, then choose whether or not the solution should be active or not. These values may be updated or changed at a later time. The ID will automatically be generated when you click the Save Button.
Once the solution has been created, processes and permissions may be added.
To update the solution, click the Action Drop Down next to the solution name in the Details Panel and click the Update Solution action.

The Update Solution Dialog will appear. The Solution ID can never be updated once it is generated.
Delete Solution
In order to delete a solution, open the solution in the Details Panel and then select the Delete Solution option. Once the deletion is confirmed, the solution, any process(es) and case types will be marked as deleted. The solution, its processes, and its case types will no longer be available for end users. This means any case instances associated to the solution will be lost.
Use the Delete Solution option with care, transferring any needed case instances to a case type outside of the solution to be deleted before deleting it.
2.2 Managing Processes
Processes are the second highest level of categorization in the Case Management Module. All case types belong to one and only one process. A process may consist of zero or more case types. All processes belong to one and only one solution. All management of processes is done via the Case Administration Page.
Display Process
To display the list of existing processes in the Case Management Module, select the Processes Item from the Object Type Drop Down. The existing processes, if any, will display underneath the Object Type Search Component.
To view the details of the process, click the process name.

Processes have the following attributes:
- Name: a user friendly, readable name for the process; can be re-used by other processes.
- ID: the universally unique identifier (UUID) for the process
- Code: An appropriate abbreviation to reference process quickly, especially useful in API calls. This should be unique across all processes
- Case Types: list of case types which belong to the process; for a complete discussion, see the Managing Case Types section.
- Permissions: A list of permissions required in order to access the process or cases types. Users must have at least one of the listed attributes in order to access the process. If no permissions are listed, then by default the process is available to any user.
If the current logged in user does not have access to the Solution, then the process(es) will NOT appear to them.
Create Process
A process is created from the Solution Details view, as a process cannot live outside the context of a solution.
To create a process,
- Navigate to the Case Administration Page
- Select the solution which will contain the new process
- On the Processes tab, click the Add Process Button

The Create Process Popup will appear:

Provide a value for the Name and the Code field and press the Save Button. The solution name will default into the currently selected Solution. The solution field can never be changed. The code field should be unique, but the name field can be re-used.
Once the process has been created, case types and permissions may be added.
To update the process, find the process via the Object Type search feature, click the Action Drop Down next to the process name in the Details Panel and click the Update Process action.

The Update Process Dialog will appear. Neither the parent Solution or the ID can ever be updated once it is generated. If you wish to “move” the process to another solution, you’ll need to create a new process from scratch in the desired solution.
Delete Process
In order to delete a process, open the process in the Details Panel and then select the Delete Process option. Once the deletion is confirmed, the process, and any case types will be marked as deleted. The process and its case types will no longer be available for end users. This means any case instances associated to the process will be lost.
Use the Delete Process option with care, transferring any needed case instances to a case type outside of the Process to be deleted before deleting it.
2.3 Managing Case Types
Case Types are the core building blocks of the Case Management Module. Whereas solutions and processes serve as categorization and grouping mechanisms, Case Types are the base definition and configuration for Case Management. They offer a wide range of functionality and features. Every time a case is created (a case instance), it must be tied to a case type.
Display Case Types
To display the list of existing case types in the Case Management Module, select the Case Types Item from the Object Type Drop Down. The existing case types, if any, will display underneath the Object Type Search Component.
To view the details of the case type, click the case type name:

Processes have the following attributes:
- Name: a user friendly, readable name for the case type; can be re-used by other case types.
- ID: the universally unique identifier (UUID) for the process
- Code: An appropriate abbreviation to reference case type quickly, especially useful in API calls. This should be unique across all case types.
- Description: A more thorough, descriptive text for the case type
- Schema: The metadata framework schema used to render, validate and persist the Extended section of the Case Type.
- Location Schema: The metadata framework schema used to identify entity objects representing locations. These entity objects will then be used to populate the Location drop down on the case instance create and edit forms.
- Transformation: The metadata framework schema used with the CRM Module integration when the case initiator is selected to be a customer (versus a user). This schema will be used to map the selected customer’s Extended section into the case type’s Extended section.
- Auto Close Time (hours): The time in hours which should elapse before resolved cases of the case type are automatically set to the CLOSED state. If a value is not provided, resolved cases must be manually marked as Closed.
- Percentage: The available percentages to display in the Percent Complete drop down on the case instance details and edit forms. If values are not provided, then the Percent Complete drop down is not displayed.
| Note |
|---|
| It is technically possible for you to reuse case type names, even within the same process. Reuse the names with care as to not confuse the end users. |
| Note |
|---|
| The metadata framework schemas are configured via the Entity Module screens. In order to use case management features utilizing these schemas, the Entity Module must be enabled. See the Entity Module documentation for more information. |
Additionally, case types may utilize the following feature sub-components:
- Service Level Agreements (SLA)
- Due Dates
- Workflows
- Notifications
Each feature sub-component is discussed below.
Create Case Types
A case type is created from the Process Details view, as a case type cannot live outside the context of a process.
To create a case type,
- Navigate to the Case Administration Page
- Select the process which will contain the new case type
- On the Case Types tab, click the Add Case Type button

The Create Case Type popup will appear.

Provide a value for the Name, Code and Description fields (required) and optionally the Auto Close Time and select if complete percent should be enabled. Then press the Save button. The solution and process name will default based on the currently selected process. The solution and process fields can never be changed. The code field should be unique, but the name field can be re-used.
Once the case type has been created, the feature sub-components and permissions may be configured.
To update the case type, find the case type via the Object Type search feature, click the Action Drop Down next to the case type name in the Details Panel and click the Update Case Type action.

The Update Process Dialog will appear. The parent solution, process or the ID can never be updated once it is generated. If you wish to “move” the case type to another process, you’ll need to create a new case type from scratch in the desired process.
Delete Case Type
In order to delete a case type, open the case type in the Details Panel and then select the Delete Case Type option. Once the deletion is confirmed, the case type will be marked as deleted. The case type will no longer be available for end users. This means any case instances associated to the case type will be lost.
Use the Delete Case Type option with care, transferring any needed case instances to a case type another case type before deleting it.
2.3.1 Service Level Agreements
A service level agreement (SLA) is a formal agreement between a service provider and its client regarding certain quality benchmarks of the service. In terms of case management, SLAs are used to measure service providers in timely resolution of a case.
Within the Thinx! Platform, SLAs provide a measure from a start state to an end state. Currently, the following measurement types are supported:
- Duration
- Count
- Percentage
Duration SLAs can be measured in minutes, hours or days.
SLAs may be in one of 3 states:
| SLA State | What does it mean |
|---|---|
| Ok | The SLA has not yet reached the warning threshold During a case update operation, even though there is not state change, the notifications configured for the current state of the case will be resent. |
| Warning | The SLA has reached the warning threshold, but not yet reached the violation threshold. |
| Violated | The SLA has reached the violation threshold. |
SLA definitions are configured on the SLA Definition page in the My Accounts sitearea and each definition for use by a single module. For more information on SLAs within the Thinx! Platform, see the Platform Framework documentation.
Like any module offering SLA support, only SLAs specifically configured for the Case Management module are available within the module. Additionally, Case Management only supports duration-based SLA Definitions. Case Management measures the time it takes for case instances to progress from a starting state to an ending state. The start and end states must be a valid state within case management:
- NEW
- OPENED
- REOPENED
- PENDING
- ONHOLD
- RESOLVED
- COMPLETED
- CANCELLED
The start and end states need not be contiguous and there can be multiple SLAs for each start and/or end states. However, not all start/end state combinations are valid.
| Example |
|---|
| A case administrator may wish to ensure that their cases are resolved within 3 days, with a warning at 2 days. The SLA definition would be as follows:
Start state = NEW |
| Example |
|---|
| This is an example of an invalid SLA Definition in Case Management:
Start state = COMPLETED This state transition cannot occur within the bounds of the Case Management state model. However, one can create an SLA Definition against this state combination. In this case, the SLA would ultimately be violated as it would never end. |
SLA definitions are assigned to case types on the Case Administration page. The same SLA definition can be assigned to multiple case types, and a case type may have multiple SLA definitions. SLAs within the Case Management module may be thought of like stopwatches. When a case instance reaches the start state of the SLA definition, the stopwatch starts. When the case instance reaches the end state of the SLA definition, the stopwatch stops. If the SLA measure and/or offset measure is exceeded, a SLA violation/warning (respectively) activity is recorded against the case instance. Notifications may be sent when the SLA reaches WARNING or EXCEEDED states (if configured).
If there is a SLA tied to a case instance, end users can quickly view the status of the SLA on the My Cases and All Cases pages. An appropriately colored circle will appear next to the case instance. In the example below, the case instance’s SLA has been violated:

Additionally, on the case details page, if the SLA is in WARNING or EXCEEDED state, end users may see the appropriate audit entry in the activity list.

If more than one SLA definition is associated to a case instance and one is in EXCEEDED state but the others are in the OK state, the red circle will appear next to the case instance. The case instance is assumed to be in overall EXCEEDED state if at least one SLA definition has been exceeded.
The SLA Job runs every few minutes and checks for any active case instances whose SLAs definitions are currently running. It then computes the state of each SLA and records any SLA warning and/or exceed violations. Each violation will occur only once: the first time it cross the measurement boundary.
| Note |
|---|
| Since the SLA job runs every few minutes, there may be a slight delay before case instances are marked as WARNING or EXCEEDED. If the time interval between the WARNING and EXCEEDED is very small, then the case instance may go from OK to EXCEEDED on the next run of the SLA job. |
SLA definitions are configured on individual case types. To configure SLA definitions:
Navigate to the Case Administration page and open the SLAs tab. The SLA tab allows administrators to associate SLA definitions (which are configured on the Thinx! Platform’s SLA Definition Page) to the selected case type and then associate notifications to the SLA definitions.
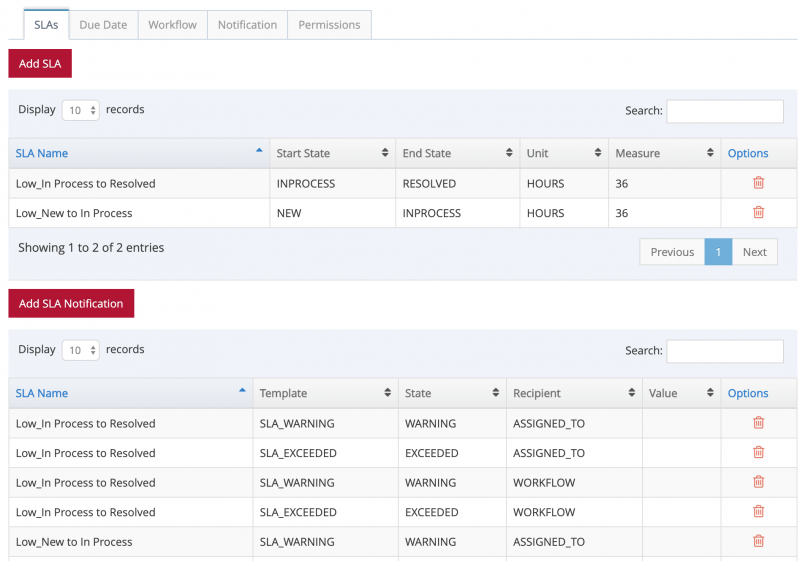
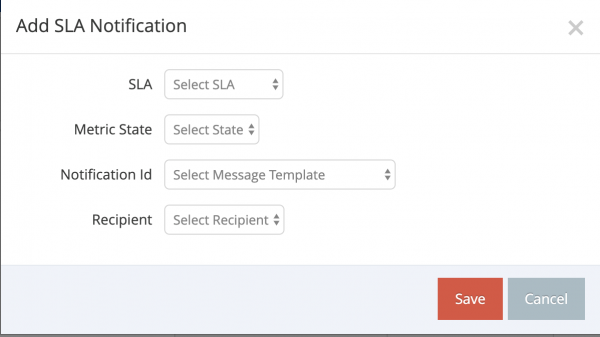
Next click on the Add SLA button to display the Add SLA popup:

The Add SLA popup will show all SLA definitions assigned to the Case Management Module. Select the SLA(s) that you wish to assign to the case type and click save. The SLA will appear in the SLA table.
If you wish for a notification to be generated when the SLA crosses into WARNING and/or EXCEEDED, then click the Add Notification button to display the Add SLA Notification popup.
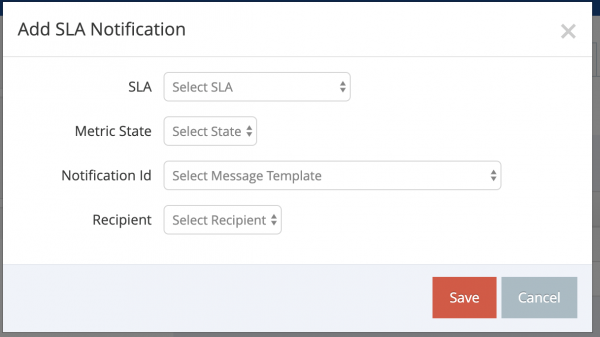
Select the SLA definition that you would like to associate a notification. Only the SLA definitions associated to the case type will be listed here.
Next select the Metric State (WARNING or EXCEEDED) for this notification.
Next, select the Email Template to use. The available email templates are the ones configured for use by the Case Management Module.
Next, select the recipient type. The standard recipient types are available:
- Initiator
- Static
- Assigned To
- Group
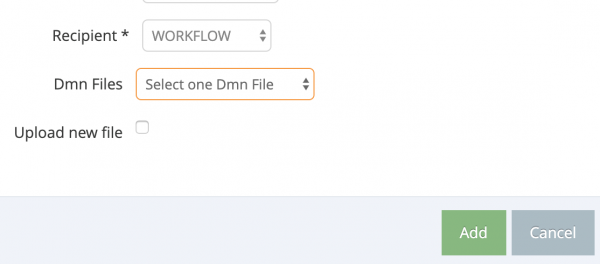
- Workflow
The recipient types are further discussed in the Notifications section below.
Finally, click the Save button and the notification appears in the SLA notification table.
2.3.2 Due Dates
When a case instance is created, a due date field is available. The case initiator may provide a due date, or the case type may be configured to automatically compute a due date.
The following configuration options are available for the automatic due date feature on the Due Date tab on the Case Type Details page:
- Due Date Offset Hours
- Due Date Warning Hours
- Due date Notifications

The Due Date Offset is number of hours from the case creation time used to derive the due date for the case instance. Any case instance who due date is in the past is considered to be Overdue. The offset should be a whole number greater than 0. If this field is set, then the automatic due date feature configuration is considered as On.
| Note |
|---|
| If the due date feature configuration is turned on for a case type, then the case initiator may NOT manually specify/change the due date. |
The Due Date Warning Offset is the number of hours from the case creation time used to determine when the case instance is approaching the due date, but not yet overdue. This warning date is computed when the case instance is created. Any case instance whose warning date is in the past will be considered as In Warning. This date is not visible to the end user and is only applicable/useful when notifications are configured for the due date feature (see below). The warning offset is not editable if the Due Date Offset is not set. It should be a whole number and be less than the Due Date Offset value.
Once any changes have been made to the Due Date Offset or Warning hours, click the Save Offsets button to persist the changes.
The due date for a case instance is calculated as current time + due date offset
The warning date for a case instance is calculated as due date – warning offset.
Changing the due date and warning offsets for a case type will NOT impact existing case instances.
| Example |
|---|
| If the Due Date Offset (in hours) is set to 12 and the Due Date Warning Offset is set to 5 and the case instance?s creation time is 1/1/2020 6:00PM, then: The case will be considered as Overdue on 1/2/2020 at 6:00AM The case will be considered In Warning on 1/2/2020 at 1:00AM |
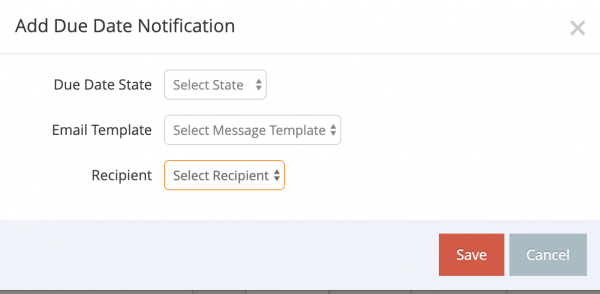
Notifications may be generated when case instances reach the Overdue and/or In Warning. To add a due date notification, click the Add Notification button to pop up the Add Due Date Notification popup.
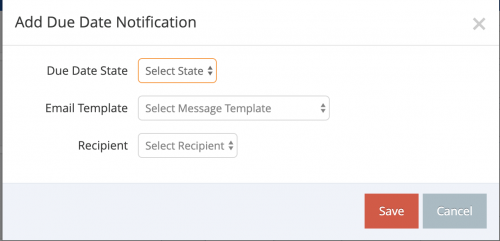
Select the Due Date State (OVERDUE or IN WARNING) for this notification.
Next, select the Email Template to use. The available email templates are the ones configured for use by the Case Management Module.
Next, select the recipient type. The standard recipient types are available:
- Initiator
- Static
- Assigned To
- Group
- Workflow
The recipient types are further discussed in the Notifications section below.
Finally, click the Save button and the notification appears in the due date notification table.
Once a case instance is created, the Check Due Date Job runs periodically and compares the due date and the warning date against the current time. If the warning date or the due date is reached, any due date notifications configured are sent. The notifications will only be sent once - when the threshold is initially exceeded.
| Note |
|---|
| In order for the Check Due Date Job to check case instances of a case type, the case type id must be added to the case_type_ids parameter value of the CaseDueDateCheckJob job configuration. This configuration is done in the My Account site area of the Thinx! Platform. |
| Note |
|---|
| Due Date functionality is completely independent from SLAs and vice versa. |
2.3.3 Workflows
The Case Management Module offers integration with several types of workflows: Decision Trees and Case Management Workflows. These workflow types evolved from standards developed by the Object Management Group (OMG). The Case Management Module workflow integration adheres to the notations and specifications developed by OMG for these workflow types: DMN and CMMN.
There are various workflow engines available which support the workflow standards and specifications defined by OMG. The Thinx! Platform currently leverages Camunda. Camunda has itself developed some extensions to the standard OMG notations. These extensions are available to the Case Management Module.
| Note |
|---|
| It is recommended to utilize/download a client to help generate a valid DMN and CMMN files. Camunda currently has a free client available called Camunda Moduler. |
Decision Model Notation (DMN)
DMN was published by OMG to describe how repeatable decisions are derived. Given a set of inputs, a known output or decision is reached. DMN consists of two parts: the Decision Requirements Diagram (DRD) and decision table. At is core, the decision tree described by the DMN will, given a set of input, produce a set of output.
DMN is described in XML format. The OMG has published a DMN a schema which should be reviewed for a full discussion of DMN syntax. Also, Camunda has good discussion of DMN and its capabilities available at https://camunda.com/dmn/ .
Within the Case Management module, DMNs may be used in case assignment and notification routing. When an integration point with a DMN is encountered in the execution of an action, the Case Management module packages all of the attributes of the case (both the structured and unstructured attributes) into a workflow context and sends them to the DMN for execution. Therefore, when the DMN has access to every attribute of the case to makes its decision.
Assignment DMNs
When a case is created, the system has the ability to determine who the case should be assigned to based on attributes of the case provided by the case initiator. This dynamic assignment is driven by the assignment DMN. As stated above, the DMN has access to all case attributes as input parameters in order to make its decision. The output of the DMN must be either a list of groupIds or a list of userIds. It cannot be both.
The text used within the DMN’s <inputExpression> element specifies how the value of the input clause is generated. This can be a simple reference to a variable provided in the context or a more complex script. The Case Management module by default will pass all attributes of the case instance as variables to the workflow engine. The variables are passed in underscore notation. The <output> element’s name attribute in the DMN. Must be equal to either assignedGroup (if the DMN produces a list of groups) or assignedUser (if the DMN produces a list of users).
Example: if there is an attributed name in the Extended section’s CustomerInfo object, then the attribute is passed as extended_customerInfo_name to the DMN. Dot notation is not used because the period cannot be used in variable names in EMCA script syntax.
| Note |
|---|
| See the latest camunda documentation for a full discussion on the DMN Decision Table features and scripting possibilities.
https://docs.camunda.org/manual/latest/reference/dmn11/decision-table/ |
The following DMN uses the structured attribute locationCode to determine which group should be assigned:

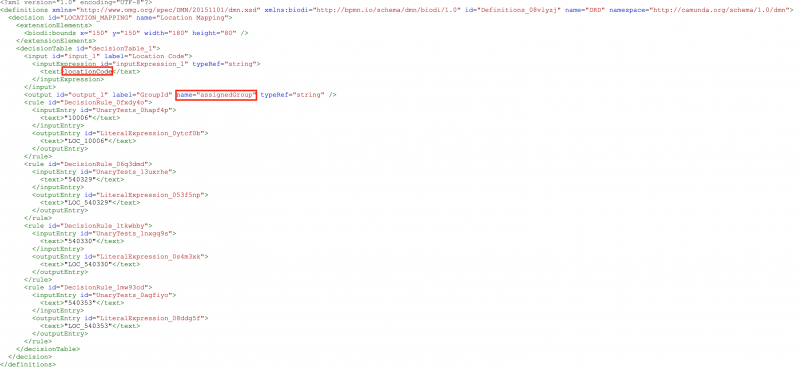
In this example, if the locationCode is equal to “10006,” then the group id “LOC_10006” is returned by the DMN.
The case administrator must configure the case type to use an assignment DMN. To do so:
- Navigate to the Case Administration Page
- Find the desired case type and open it
- Click the Workflow Tab
- Click the Upload Decision button
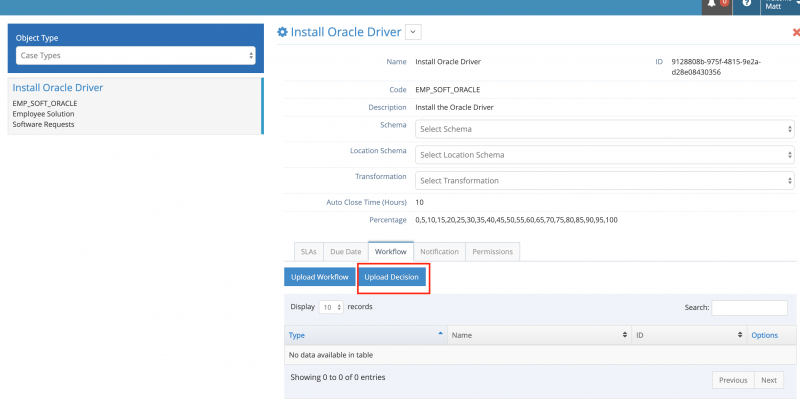
The Upload Decision popup window appears

- Select the DMN file you wish to attach to the case type.
- In the Apply To radio group, select the scope of the upload.
- Click the Upload button to associate the given DMN file to the case type(s).
If there is already an assignment DMN file associated to the case type(s), the uploaded DMN file will replace the current file. The impact is immediate and any in flight case instances may be impacted.
The Apply To radio group enables the administrator to attach the decision tree to multiple case types at one time. The upload can be applied to all case types within the Process, all case types within the solution or just to the currently selected Case Type.
Notification DMN
Decision Trees may also be utilized when sending notifications. Specifically, the decision tree is used to determine which user(s) or group(s) need to be notified using the Workflow Recipient Type. Once determined, the notification will be sent to those users. Please see the Notifications section below for a full discussion of the Notifications functionality. As stated previously, the DMN has access to all case attributes as input parameters in order to make its decision. The output of the DMN must be either a list of groupIds or a list of userIds. It cannot be both.
Like the assignment DMN, the text used within the DMN’s <inputExpression> element specifies how the value of the input clause is generated. This can be a simple reference to a variable provided in the context or a more complex script. The Case Management module by default will pass all attributes of the case instance as variables to the workflow engine. The variables are passed in underscore notation. The <output> element’s name attribute in the DMN. Must be equal to either assignedGroup (if the DMN produces a list of groups) or assignedUser (if the DMN produces a list of users).
The following DMN uses the structured attribute locationCode to determine which users should receive a notification:


In this example, if the locationCode is equal to “10006,” then the user ids MMILLER and RJAFFARI are returned by the DMN. The system will then retrieve the emails associated to the user ids and send the associated notification.
See the Notifications section below for a discussion on how to configure notifications.
Case Management Model Notation (CMMN)
Initially, the OMG helped develop Business Process Model Notation (BPMN) to express repeatable, predictable business processes. However, not all business processes follow this predictability. Some processes, such as problem tickets or case instances, must adapt to specific conditions within the context of the ticket/case. Therefore, CMMN was published by OMG to express a work method or process requiring tasks or activities that may occur in a unpredictable order in response to specific and evolving conditions. CMMN is a subset of BPMN.
Within the Case Management module in the Thinx! Platform, CMMN is used to conditionally make available tasks and milestones within a case instance. When a CMMN is attached to a case type, tasks are made available to the case instance and end user via the Tasks section in the Case Instance details screen. The user may (or may not) choose to create one of these tasks. See the screen shot below:

Tasks 1 − part 1, Task 2 − Part 1 and Task 3 are all tasks defined from a CMMN attached to the case type. The Ad Hoc Task is always available, even if there is no CMMN present on the case type.
| Note |
|---|
| The Task section for each case instance integrates with the Task Module within the Thinx! Platform. The Ad Hoc Task is a plain task within the Task Module. CMMN tasks also integrate seamlessly within the Task Module. |
Once created, the CMMN task may be marked in progress and subsequently closed. Subsequent CMMN tasks may be dependent upon the completion of a previous task. For example, a task called Generate Invoice maybe available. Only once that task is complete, then the “Email Invoice” task would appear.
Milestones appear in the activity of a case instance
Milestones will be checked by job
Like the DMN, all attributes of the case instance are made available as variables to the underlying workflow engine when executing a particular task or checking if a milestone tollgate has been reached. The Case Management module by default will pass all attributes of the case instance as variables to the workflow engine. The variables are passed in underscore notation.
Example: if there is an attributed name in the Extended section’s CustomerInfo object, then the attribute is passed as extended_customerInfo_name to the CMMN. Dot notation is not used because the period cannot be used in variable names in EMCA script syntax.
Sample CMMN file → show how it appears in case instance/details screen
[Screen shots]


Steps to upload
2.3.4 Notifications
The Case Management Module offers a robust set of notification capabilities within the life cycle of a case instance. These capabilities are configured directly against the case types through the Case Administration page.
The following life cycle events of a case instance can generate notifications:
| Life Cycle Event | Trigger |
|---|---|
| State Change | A case action is invoked against a case resulting in a state change for the case instance. An example of a case action would be create or cancel case.
During a case update operation, even though there is not state change, the notifications configured for the current state of the case will be resent. |
| Comment Added | When a comment is added to an inflight case instance, users currently assigned to case may receive a notification (if configured). |
| Assigned to user changed | During the update of an existing case, in the event that the assigned to user field changes, newly added assigned users of the case may receive a notification (if configured). An update occurs whenever the user clicks the Save button from the Edit Case UI or whenever the Update REST API endpoint is invoked. The update does NOT result in a state change.
See State Change above for more information on notifications sent on update. |
| Due Date Event | If a due date has been provided for a case instance and the due date now occurs in the past, a notification may be sent.
Similarly, if a warning date has been provided for a case instance and the warning date now occurs in the past, a notification may be sent. Any configured notification will be sent only once per case instance. |
| SLA Event | For any SLA attached to a case type, administrators may configure notifications be generated once the SLA reaches the WARNING or EXCEEDED state.
Any configured notification will be sent only once per case instance. |
Case notifications generated from a life cycle event generally may be directed to one of more recipient types. The following recipient types are available:
| Recipient Type | Who | Applicable Life Cycle Events |
|---|---|---|
| Initiator | The initiator of a case. |
|
| Static | A static email address. |
|
| Assigned To | The users currently assigned to the case. The case may be assigned to a group, in which case the Assigned To recipient type translates to the users comprising the assigned to group. |
|
| Group Id | The users comprising a group within the Thinx! Platform. When a notification is set to a recipient type of Group Id, all users assigned to the specified group will be notified. |
|
| Workflow | Users derived as the result of an execution of a Decision Tree workflow (DMN file). |
|
When one of the above-mentioned life cycle events occurs, the Case Management module will automatically generate the notification. The corresponding Messaging template is retrieved from the Thinx! Platform’s Messaging module and any dynamic values within the template are substituted from values within the context payload before being sent to the configured recipient type. The Case Management module will automatically include all case attributes (both structure and unstructured) into the context payload. Therefore, administrators have every attribute’s value available for substitution in the Message Template.
Notifications features are enabled on several tabs on the Case Administration page. Most notifications are configured on the Notifications tab, but the SLA and Due Date notifications are configured on their respective tabs.
| Note |
| Notifications are sent asynchronously. The request to send the notification is queued. Therefore, users may notice a slight delay in receiving the notification. |
Enabling Notifications on Notification Tab
From the Notification tab, notifications for State Change, Comment Added, and Assigned to User change life cycles are configured.
State Change Notifications
- To add a State Change notification, click the Add Notification button to display the Add Notification popup.
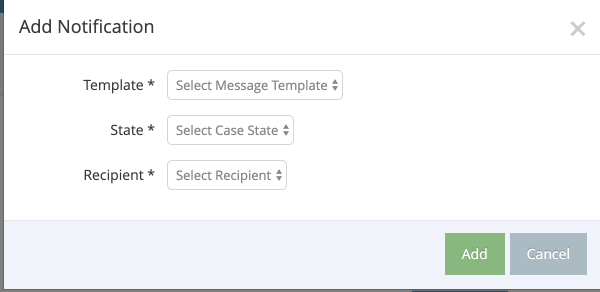
- Next, select the Message Template you wish to use. This drop down is populated with all messaging templates associated to the Case Management module within the Messaging module. Please see the Messaging module documentation for details on how to configure messaging templates.
- Select the State for the notification. The state selected is the target state; in other words, the state to which the case is transitioning. Only one state may be configured at a time. If you require multiple recipient types receive notifications for a state change, then you can configure another notification.
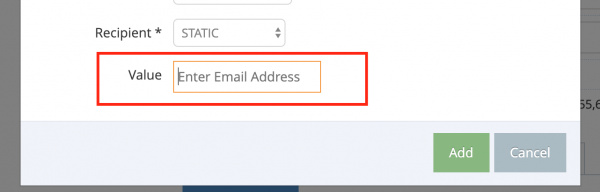
- Select the Recipient Type for the notification. Only one recipient type may be selected at a time. Depending on the recipient type selected, an additional entry may appear. For example, if the STATIC recipient type is selected, you’ll need to provide an email address to which the notification will be sent.
- Click the Add button to add the notification to the Case Type. Adding a notification to the case type will impact existing case instances, should they transition into the specified state.
| Note |
|---|
| This section discusses attaching permissions to solutions, processes and case types. It does not describe the available permissions within Case Management. See section 3 for more information about these permissions.
|
Comment Added Notification
To add a notification template for a comment added to a case instance life cycle event, select the template id in the Comment Message drop down. Administrators do not need to assign a recipient type for this notification as it defaults to ASSIGNED TO. If a comment is added to a case instance, then any users assigned to the case will receive the selected notification.

Update Assigned To Notification
To add a notification for the Update Assigned To life cycle event, select the template id in the Update Assigned To drop down. Administrators do not need to assign a recipient type for this notification as the system will send the notification to any newly added assigned to user.

Watcher Template
Interested parties may add themselves or be added to individual case instances as a “watcher”. When a state change, update or SLA warning or violation occurs, watchers will be notified that a change has occurred. Administrators must configure the watcher template per case type by selecting the notification template id in the Watcher drop down.

Enabling Due Date Notifications
For a more complete discussion of Due Date features within Case Management, see the Due Dates section above.
In order to configure a due date notification:
- Click the Add Notification button to display the Add Due Date Notification Popup.
- Select the Due Date State. The Due Date State is either IN WARNING or OVERDUE. Only one state may be configured at a time. If you require a recipient type receive notifications for different Due Date States, then you can configure another notification.
- Next, select the Message Template you wish to use. This drop down is populated with all messaging templates associated to the Case Management module within the Messaging module. Please see the Messaging module documentation for details on how to configure messaging templates.
- Select the Recipient Type for the notification. Only one recipient type may be selected at a time. Depending on the recipient type selected, an additional entry may appear. For example, if the STATIC recipient type is selected, you’ll need to provide an email address to which the notification will be sent.
- Click the Save button to add the Due Date notification to the Case Type. The notification will impact existing case instances, provided that those case instances have due/warning date attributes present.
Enabling SLA Notifications
For a more complete discussion of SLA features within Case Management, see the Service Level Agreement section above.
| Note |
| In order to add an SLA notification, there first must be a SLA configured on the case type. |
In order to configure a SLA notification:
- Click the Add SLA Notification button to display the Add SLA Notification Popup.
- Select the SLA from the SLA drop down. The SLA drop down will display all of the configured SLAs for the case type.
- Select the SLA Metric State. The SLA Metric State is either WARNING or EXCEEDED. Only one state may be configured at a time. If you require a recipient type receive notifications for both Metric States, then you can configure another notification.
- Next, select the Message Template you wish to use in the Notification Id drop down. This drop down is populated with all messaging templates associated to the Case Management module within the Messaging module. Please see the Messaging module documentation for details on how to configure messaging templates.
- Select the Recipient Type for the notification. Only one recipient type may be selected at a time. Depending on the recipient type selected, an additional entry may appear. For example, if the STATIC recipient type is selected, you’ll need to provide an email address to which the notification will be sent.
- Click the Save button to add the SLA notification to the Case Type. The notification will impact existing case instances, provided that those case instances have the selected SLAs present. For example, if you add an SLA to the case type, create a case instance, and then go back into the Case Administration page and add a SLA notification, then the case instance will be impacted by the notification added.
2.4 Permissions
| Note |
| This section discusses attaching permissions to solutions, processes and case types. It does not describe the available permissions within Case Management. See section 3 for more information about these permissions. |
The Case Management Module offers the ability to grant fine grained access to solutions, processes, and case types by assigning permissions. When a permission is assigned to a solutions, processes or case types, when the user attempts to access that object, a check is made against the user’s permissions and compared with the permission (if any) attached to the objects. If the user has been granted at least one of the associated permissions, then they are considered as authorized and the check succeeds. This authorization check is also performed whenever a user attempts to access a case instance. The underlying solution, process and case type is checked to ensure the user is authorized to view the case instance.
| Note |
| Users with Case Management ALL access (the CASE_ALL permission) always will have access to any solution, process or case type, even if permissions are applied. |
By default, no permissions are assigned to newly created case administration objects. Therefore, by default, these objects are available to all users.
The permissions assigned are hierarchal in nature. The permissions are first checked against the solution, then the process, and finally the case type. If the user is not granted access at the solution level, then the module will not check the process access level. In other words, if the user doesn’t have access to the solution, and even if they have access to the underlying process, then no processes from the solution will be available. Conversely, administrators may secure entire processes and/or case types by securing the parent level.
In order to apply authorizations against a solution, process or case type:
Configure the necessary components in User Management
Use the User Management screens available in the My Account site area or the UMA REST APIs to define the necessary permission(s), provision the role(s) and users accordingly.
Assign the Permission(s) to the required Case Object
- Navigate to the Case Administration Page
- Select the desired solution, process, and/or case type
- Navigate to the Permissions Tab
- Click the Add Permission button
- Select the required permission(s)
- Click the Save Button

The permission is immediately associated to the solution, process, or case type.
